
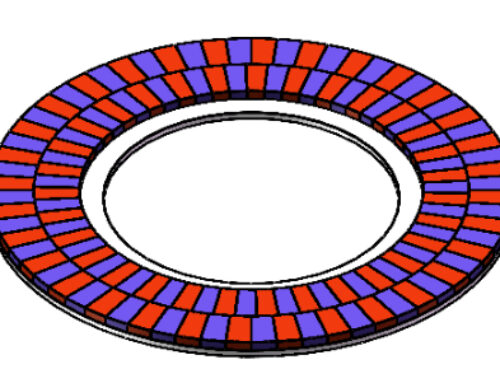
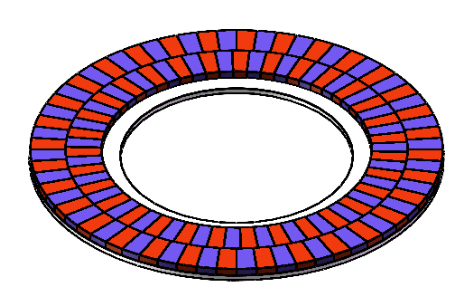
Understanding Halbach Array Ring Configurations
At NBAEM, we treat the Halbach array ring magnet as the pinnacle of magnetic engineering. Unlike standard magnetic assemblies, a Halbach configuration utilizes a specialized rotation of magnetic vectors to concentrate the magnetic field on one side while nearly canceling it on the other. This “self-shielding” effect allows us to achieve 1.4x–2x higher flux density compared to conventional arrangements, making it essential for high-performance motors and precision focusing applications.

Linear vs. Halbach Array Ring
While a linear array is essentially a flat track of magnets used for planar motors or latches, a Halbach array ring(or halbach array cylinder) wraps that logic into a continuous loop. In a linear setup, the field is augmented on one face. In a circular setup, the geometry forces the magnetic flux into a confined space—either the internal bore or the external perimeter—creating a significantly stronger field than a standard dipole ring could ever achieve.
Key Types: ID-Focused vs. OD-Focused Fields
When designing a Neodymium Halbach array ring, the first question we ask is: Where do you need the power? The orientation of the magnetic vectors determines whether the flux is trapped inside or projected outside.
| Feature | ID-Focused (Internal Field) | OD-Focused (External Field) |
|---|---|---|
| Flux Location | Concentrated in the center bore (Hole). | Concentrated on the outer circumference. |
| Shielding | Exterior is magnetically “quiet.” | Interior is magnetically “quiet.” |
| Common Uses | Particle steering, plasma constraint, dipole magnets. | Brushless DC motor rotors, magnetic couplings. |
| Design Logic | Vectors rotate to push flux inward. | Vectors rotate to push flux outward. |
Magnetization Patterns & Segment Counts
The magic of a Halbach array magnetization pattern lies in the sequential rotation of the easy axis. For a standard cylinder, we typically utilize a k-value (integer) to define how many times the flux pattern repeats around the ring.
To build this, we don’t just stick magnets together randomly. We follow a strict 90° orientation sequence:
- Segment 1: North pole points UP (Radial Out)
- Segment 2: North pole points RIGHT (Tangential)
- Segment 3: North pole points DOWN (Radial In)
- Segment 4: North pole points LEFT (Tangential)
This cycle repeats. The smoothness of the sine wave distribution improves with a higher number of segments per pole. While 4 segments per pole is standard, high-end applications often require 8 or more to reduce “cogging” and optimize field uniformity.
Single-Piece vs. Segmented Arc Construction
Creating a true one-sided flux magnet presents manufacturing choices:
- Segmented Arc Construction: This is the most common method for industrial applications. We manufacture individual trapezoidal or arc segments (usually Sintered Neodymium or SmCo) with specific magnetization directions and glue them into a ring. This allows for massive scalability and the use of the strongest N54 grades.
- Single-Piece Multi-Pole: For smaller sensors or precision instruments, we can manufacture a single isotropic ring and use a specialized magnetizing fixture to imprint the Halbach pattern. However, this generally yields lower magnetic strength compared to the segmented assembly method we use for heavy-duty rotors.
Materials and Tools Required for Assembly

Recommended Magnets: Neodymium vs. Samarium Cobalt
Selecting the right magnetic material is the foundation of a high-performance Halbach array ring magnet. For most applications requiring maximum flux density, we recommend Sintered Neodymium (NdFeB). Our inventory ranges from N35 to N54 grades, providing the extreme magnetic strength needed to achieve the characteristic 1.4x–2x performance boost of a Halbach configuration.
However, if your application involves high operating temperatures, such as specific industrial motors, Samarium Cobalt (SmCo) is the superior choice. Unlike standard neodymium, SmCo maintains stability in environments up to 300°C. For advanced engineering projects, incorporating laminated magnet structures can further reduce eddy current losses in high-speed applications.
Essential Tools for Precision Assembly
You cannot assemble a Halbach cylinder magnet with bare hands due to the intense repulsion forces between segments. The following tools are non-negotiable for a safe build:
- Non-Magnetic Assembly Jig: A custom-machined fixture (usually aluminum or rigid plastic) is required to hold each segment in place during the bonding process.
- Structural Epoxy: High-strength industrial adhesive is necessary to counteract the magnetic forces trying to push the ring apart.
- Magnetic Pole Viewers: Viewing film or a pole detector is critical for verifying the 90° orientation sequence before gluing.
Optional Equipment for Professional Results
To ensure the circular Halbach array meets tight tolerances, precision calipers are useful for measuring segment fitment. Additionally, utilizing a non-magnetic housing ring (sleeve) made of carbon fiber or stainless steel can provide external structural reinforcement, preventing the array from shattering under its own magnetic pressure. For those lacking specialized equipment, our engineering services offer a reliable alternative to DIY fabrication, ensuring ISO-compliant precision.
Safety Considerations: Critical First Steps
Building a Neodymium Halbach ring involves managing extreme forces that standard magnet handling simply does not prepare you for. The fundamental principle of a Halbach array is forcing magnetic vectors to oppose each other to create a strong one-sided magnetic field. This creates immense potential energy within the assembly. If a segment slips during the process, the magnets can snap together with enough velocity to shatter the brittle sintered NdFeB material, sending sharp fragments flying across the room. We treat this risk with absolute seriousness in our industrial manufacturing facilities.
To properly manage these Halbach array safety precautions, your workspace setup is vital. You must clear the area of all loose ferrous metal parts before bringing any magnets into the room. We strongly recommend using non-magnetic tools made of brass, plastic, or non-magnetic stainless steel. Standard steel tools can become dangerous projectiles if pulled into the array’s concentrated flux.
Essential Safety Gear and Protocols:
- Eye Protection: Always wear impact-resistant safety goggles with side shields to protect against flying magnet shards.
- Hand Protection: Use heavy-duty gloves. The pinch force between segments can easily cause severe blood blisters or crush injuries.
- Electronics Clearance: Keep phones, watches, and credit cards at least 1 meter away. The concentrated flux is far more potent than standard magnets.
- Secure Fixturing: Never attempt to hold segments by hand. Use a dedicated jig or professional magnet assembly fixture to control the orientation safely.
Step-by-Step Guide to Building a Halbach Array Ring Magnet
Building a Halbach array ring magnet is a precise engineering challenge that transforms standard permanent magnets into a focused magnetic lens. Unlike stacking simple discs, this process requires fighting strong repulsive forces to create a self-shielding magnetic circuit. Whether you are building a high-efficiency motor or a research fixture, following a strict DIY Halbach ring tutorial structure is the only way to ensure success without injury or wasted materials.
Step 1: Design and Planning Ring Diameter
Before touching a single magnet, you must determine the geometry. Are you building a Halbach cylinder magnet (k=2) to concentrate the field inside the bore, or an OD-focused array?
- Segment Count: Decide on the number of segments per ring (usually 8, 12, or 16). More segments create a smoother sinusoidal field but increase assembly difficulty.
- Tolerance: Account for the adhesive gap. If your design is too tight, the magnets won’t fit; too loose, and the alignment suffers.
Step 2: Preparing Magnets and Marking Polarity
Preparation is the most critical phase. You must identify and mark the North pole on every single segment. A single error here will ruin the entire circular Halbach array.
- Use a reference magnet to check every piece.
- Mark the direction of magnetization clearly with a permanent marker.
- Understanding the manufacturing limitations of your raw materials is helpful here; knowing how to make NdFeB magnets provides insight into why grain orientation is fixed and cannot be altered during assembly.
Step 3: Building the Slotted Assembly Jig
You cannot assemble a neodymium Halbach array ring by hand. The repulsion forces will be too strong. You need a custom Halbach array assembly jig.
- Material: Use non-magnetic materials like aluminum, brass, or high-infill 3D-printed PETG.
- Design: Create a “sleeve” or slotted ring that holds each segment in its exact geometric position while allowing you to slide them in one by one.
Step 4: Sequential Assembly and Rotation
This is where the Halbach array orientation sequence comes into play. You are not placing magnets with alternating poles (N-S-N-S). Instead, you are rotating the magnetization vector.
- The Pattern: For a standard array, the pattern typically involves rotating the magnetization 90 degrees for each subsequent segment (e.g., Up, Right, Down, Left).
- Insertion: Slide the first magnet into the jig. Secure it.
- The Fight: As you insert the next magnet, it will fight you. It will try to twist or jump out. Use non-magnetic clamps to force it into the slot adjacent to the first one.
Step 5: Securing with High-Strength Epoxy
Once the segments are clamped in place, they are under immense stress.
- Apply a high-grade structural epoxy (like Loctite or specific magnet bonding agents) to the contact surfaces.
- Do not use standard superglue; it is brittle and often shatters under the shear stress of a strong one-sided magnetic field.
Step 6: Curing and Safe Removal
Allow the epoxy to cure for the full recommended time (often 24 hours). Do not rush this. Once cured, the permanent magnet ring assembly is self-supporting.
- Mechanically push the ring out of the jig.
- Handle with extreme care—the magnetic field is now “live” and highly concentrated.
Testing and Verification Procedures
Once the epoxy has fully cured, verifying the magnetic field orientation is critical before integrating the component into a larger system. Since a Halbach array ring magnet relies on precise vector rotation, a simple pull test isn’t enough. We need to confirm that the magnetic flux is concentrated on the target side (ID or OD) and effectively cancelled on the other.
Visualizing the Field
The quickest way to check the assembly is using magnetic viewing film. When placed against the active side of the ring, the film should reveal a dense, continuous field pattern. Conversely, placing the film on the shielded side should show a significantly weaker or “blurry” reaction. This visual confirmation ensures that the 90° orientation sequence was applied correctly during the build.
Measuring Flux Density
For engineering-grade validation, we use a calibrated gaussmeter to measure the peak flux density.
- Active Side: Readings should be significantly higher than a standard radial magnet of the same mass.
- Shielded Side: The field strength should be near zero, proving the self-shielding effect is working.
Performance Comparison
A correctly assembled Halbach cylinder delivers a 1.4x to 2x increase in flux density compared to conventional arrangements. In practical applications, this boost allows for substantial weight reduction without losing power. This efficiency is exactly why high-performance magnetic motor assemblies utilize this configuration to maximize torque while eliminating heavy back-iron shielding. If your measurements don’t show this distinct amplification, the segment orientation likely needs re-evaluation.
Common Challenges and Troubleshooting
Building a Halbach array ring magnet is not like stacking standard magnets; the physics fight you every step of the way. Even with a solid plan, issues arise. Here is how to handle the most frequent problems during assembly.
Managing Extreme Repulsion Forces
The biggest hurdle is keeping the magnets from flying apart before the adhesive cures. In a circular Halbach array, adjacent segments often repel each other violently.
- Use a robust jig: You cannot hold these by hand. A 3D-printed or CNC-machined Halbach array assembly jig is mandatory to hold segments in place.
- Mechanical clamping: Relying solely on glue during the initial set is risky. Use non-magnetic clamps to apply pressure until the bond is permanent.
- Slide, don’t drop: Slide magnets into their slots from the side rather than dropping them in from the top to maintain control.
Correcting Orientation Errors
A single misaligned magnet destroys the one-sided flux effect. If you glue a segment with the wrong Halbach array orientation sequence, the field will distort, and efficiency drops.
- Mark every face: Before applying any glue, mark the North and South poles on every single segment.
- Dry run: Assemble the ring without glue first (if your jig allows) to verify the field pattern using magnetic viewing film.
- Removal: If a mistake happens, removing a glued magnet is difficult. You may need to use solvents, but be careful not to damage the coating of the surrounding Neodymium Halbach ring segments.
Preventing Demagnetization and Heat Damage
Heat is the enemy of strong permanent magnets. Standard N-grade neodymium loses strength if it gets too hot, which can happen during epoxy curing or if the finished rotor overheats.
- Monitor curing temps: Some industrial epoxies generate heat as they cure (exothermic reaction). Ensure the temperature stays within the safe range for your specific neodymium magnets.
- Avoid machining: Never try to grind or cut the magnets after assembly. The friction heat will demagnetize them instantly and create flammable dust.
- Material selection: For high-temperature environments, choose magnets with higher temperature ratings (like SH, UH, or EH grades) rather than standard N-grades.
Reinforcing Against Structural Failure
A Halbach array cylinder magnet is under immense internal stress. The magnetic forces are constantly pushing the ring outward, trying to explode the assembly.
- External sleeving: Adhesive alone is rarely enough for high-speed rotors. Wrap the finished ring in a carbon fiber sleeve or press-fit it into a non-magnetic stainless steel or titanium housing.
- Gap filling: Ensure there are no air gaps between segments. Fill any voids with epoxy mixed with micro-balloons to prevent movement under load.
When DIY Isn’t Enough: Professional Custom Solutions
While building a Halbach array ring magnet at home is an excellent way to understand magnetic theory, manual assembly hits a hard ceiling when precision is paramount. For industrial applications, electric motors, or high-tech sensors, the “close enough” approach of a garage build simply won’t deliver the necessary performance or safety.
Limitations of Homemade Halbach Assemblies
Hand-assembling a circular Halbach array introduces inevitable errors. Even with a 3D-printed jig, slight variations in magnet dimensions and glue thickness lead to “tolerance stacking.” This results in an unbalanced rotor or a non-uniform magnetic field. Additionally, standard commercial epoxies may fail under the extreme centrifugal forces generated by high-speed motors, turning your project into a safety hazard.
Benefits of Expert Manufacturing
As a custom Halbach array ring manufacturer, we operate with precision equipment that far exceeds DIY capabilities. We utilize advanced simulation software to calculate the exact magnetization pattern required for optimal efficiency. Unlike manual assembly, our industrial processes often involve assembling unmagnetized segments and then applying the field, or using precision-ground NdFeB Halbach cylinder segments that interlock perfectly.
We also provide access to superior magnets and materials that aren’t typically available on the consumer market, such as high-temperature grades essential for automotive or aerospace applications.
DIY vs. Professional Manufacturing:
| Feature | DIY Assembly | Professional Manufacturing |
|---|---|---|
| Precision | Low (Manual errors) | High (Micron-level tolerances) |
| Field Uniformity | Inconsistent | Near-perfect sinusoidal waves |
| Structural Integrity | Dependent on consumer glue | Industrial bonding & sleeving |
| Scalability | Single prototypes only | Mass production ready |
Custom Specifications for High-Performance
When you need a neodymium Halbach ring that pushes the limits, professional fabrication is the only path. We can engineer rings with specific K-values to optimize the field for your unique application, whether it’s focusing flux on the ID for a rotor or the OD for a bearing. Professional manufacturing ensures ISO-grade quality control, guaranteeing that every ring performs exactly as specified in the datasheet.
Frequently Asked Questions About Halbach Array Ring
How much stronger is a Halbach array ring than a standard magnet?
The performance gap is significant. A correctly engineered Halbach array ring magnet typically delivers 1.4 to 2 times higher flux density on the working face compared to a standard diametrically magnetized ring of the same volume. This “self-shielding” effect concentrates the magnetic field entirely on one side (either the ID or OD), allowing engineers to reduce the overall weight of motors or couplings by up to 20% while maintaining or increasing torque.
Can I assemble a Halbach array without a jig?
For industrial-grade applications, the answer is no. The repulsion forces between the magnet segments are extreme, especially when dealing with high-grade N50 or N52 materials. Without a specialized non-magnetic assembly jig, the segments will inevitably flip, shift, or shatter during construction. Precision is critical; even a slight misalignment disrupts the magnetic vector rotation, ruining the efficiency of the Halbach array. We strictly use custom tooling to ensure the 90° orientation sequence is locked in perfectly.
What is the best adhesive for neodymium magnet assembly?
Standard consumer glues are insufficient for the mechanical stress a Halbach array cylinder magnet endures. We recommend high-strength structural epoxies specifically formulated for metal bonding. These adhesives must handle the shear forces generated by the magnetic repulsion and accommodate thermal expansion differences. For high-temperature environments, such as in electric motors, the adhesive selection is just as critical as choosing the right magnet grade to prevent failure under load.

Leave A Comment